Creating your first translation as the system owner (I.e., without assigning any tasks to team members)
Tip
Each task/step is included in the recommended sequential order to execute.
The procedures to complete the task as well as any optional steps, tips, and tricks are included in dropdowns just below each task.
The items labeled as optional are not required for project delivery but are placed in the order in which they need to be executed nonetheless.
STEP 1: MANDATORY - Define the linguists involved in the localization process
Adding linguists
Important
Follow the basic procedure indicated below, and in step 5 ensure that the linguist role is selected.
Adding a new user
Tip
For more info see the user definition and quick reference guide.
Important
All steps are mandatory unless otherwise indicated.
From the top menu in XTM-Cloud click on Users.
From the ensuing menu, click on the User list tab located on the top left-hand side.
Click on the green Add User button located on the top right-hand side.
From the ensuing window enter the first and last name of the user.
In the Roles list box select the role and then click the
 to add it to the list located to the right of this green arrow button.
Selecting Multiple List Box Items
Double-clicking on an item moves that item to the next box.
For Windows, hold the ctrl key down to select multiple items one at a time, or hold the shift key down to select multiple sequential items.
On a Mac, hold the shift key down to select multiple sequential items.
If the Role selected in the previous step is a linguist then add a workflow step as indicated here .
Scroll down and enter a Username.
Tip
The username is what will appear on all records and analytics such as comments and TM entries.
Enter a Nickname.
Tip
The nickname is what appears in all XTM chats (how PMs and linguists communicate with each other) making sure that the users remain anonymous.
Enter an initial password.
Tip
By default, XTM will force the user to change this password the first time they log in. This can be changed by an administrator using this procedure.
Confirm the password by re-entering it in the field that follows.
Enter the user's email address.
Tip
The e-mail address is what is used to log in to XTM.
Select a default currency.
Note
This is used for cost estimates and invoices.
Check the Send account creation e-mail box. - Optional
Tip
This will automatically send the user an email with their login credentials including the password.
Click the
 button to add this user.
In the confirmation popup that appears enter your login credentials to confirm the addition or modification of this user.
Tip
After the user is saved, multiple options will appear on the left-hand side as menus. Keep this screen open to access these menus in order to complete the remaining steps which are role dependent.
Supplementary Steps For Linguists:
Assign language combinations - Mandatory
Assign subject matters - Optional
Assign access rights - Optional
Assign User groups to combine linguists with common skillsets, by clicking on the User Group tab - Optional
Tip
If a user group does not appear in the selection list then please add it using this procedure.
Assign qualifications by clicking the Qualifications tab- Optional
Tip
Qualifications are custom-defined certificates or skills that are solely used as an internal reference.
OPTIONAL - Connect to an LSP and use their users and linguists.
Tip
LSPs can be used simultaneously with internal users.
STEP 2: MANDATORY - Define customers
Adding a new customer
Tip
For more info see the customer definition and reference guide.
From the top most menu in XTM Cloud click on the Customers tab.
From the ensuing menu, click on the Customer List tab located near the top left-hand side.
Click on the green Add Customer button located on the top right-hand side.
In the Details Section, Enter data for the mandatory and optional fields (Consult this reference describing each option in this section).
As an option, add the contact information of the customer in the Address section if relevant.
Click on one of the
 buttons to save the customer.
The Customer that was just added can now be viewed in the customer list tab.
Add language combinations to this customer using the instructions indicated here.
Customer field reference - details section
Customer (Mandatory):
See the customer reference for ideas on naming.
Customer Nick Name (Optional):
The nickname is used to hide the full customer name from the linguists. Linguists will then instead see the nickname in the Customer column in all the functions that they perform such as viewing their tasks.
TM and Term Only (Optional):
The TM and Term Only means that the customer is only a repository for terminology and Translation Memory. Projects can't be created under such a customer.
VAT Number (Optional):
Merely for internal reference.
Project Manager (Optional):
By default, the user-configured here gets notified when a workflow step is completed in a Project that uses this Customer.
If no PM is assigned to a customer, ALL PMs in the system receive a notification.
Project Watchers (Optional):
Additional Project Managers can be defined here who get notified when a workflow step is completed in a Project that uses this Customer.
Customers
Tip
A single Project Manager and any backup Project Managers (called watchers in XTM) are always assigned to a customer and not a project.
How a customer is defined
Each customer within the software is defined as an entity that contains unique translation memory, terminology, and rules.
Each customer is then assigned to a project (where job-specific-parameters are applied) so that it can be sent for translation.
Tip
The Project Managers are assigned at the customer level.
Examples of customers in XTM
An example of a customer can be:
Content-type. E.g. Help-desk
A business unit or function within a corporation. E.g. Marketing.
A product. E.g. XXX-WebApp, XXX-MobileApp.
A vendor E.g. XXX-Content management system.
Different project managers managing different content would require different customers. Project managers are defined by customers.
A workflow. E.g. Machine Translated Articles.
Tip
A single customer in XTM can contain multiple pieces of content. For example, a single customer can combine a web application and mobile applications.
Just keep in mind that each piece of content that a customer represents contains very similar terms and translations (I.e translation memory) unique to other customers.
XTM attributes that can be assigned to a customer
The following items can be assigned to customers:
Machine translation engines - Machine translation engines are configured globally however each customer can have its own unique machine translation settings and engine. These are configured on the customer configuration screens under settings.
Terminologies (Glossary) - Customers are assigned on the terminology import and management screens by Terminologists. Terminology can be turned on or off per customer on the customer management screens.
Translation memory - Customers are assigned on the TM Import and TM Align screens when migrating from other systems. Otherwise each time a new customer is created, a translation memory file is automatically created and assigned to this customer.
User groups - Customers are assigned on the user group screens by project managers.
Project managers/project watchers - Assigned on the customer configuration screen.
XTM attributes that customers are assigned to
Customers are assigned in:
Projects - assigned only when creating a new project.
Note
The customer assigned during project creation can't be changed once a project is created.
Sharing translation memory and terminology across customers
A translation memory and terminology can still be shared across different customers for items that are similar.
Splitting content into different customers ensures that any updates to terms or translation memory in one customer have no effect on the terms and TM stored in the other.
Sharing TM and terms is especially useful when using machine translation in a workflow.
Note
The sharing of Translation Memory and Terminology is done within each individual Project.
Determining how many projects to create for a given customer
Tip
The major difference between the two is that a customer is static, while a project is dynamic that changes as the requirements of the translation job change over time.
Each project can only have one customer, but each customer can be a part of many projects.
Each customer within the software is defined as an entity that contains a unique Translation Memory, terminology, and rule set.
Each customer is then assigned to a project (where job-specific parameters are applied) so that it can be sent for translation.
Example 1: Translating a web application and a mobile application for Product-X
For example, let's say that you are translating a web application and a mobile application for Product-X.
In the case of a customer, the web application and mobile application have almost identical translation memory and terminologies.
Note
Hence one can create a single customer called Product-X.
In the case of a project, a Project Manager can send the content for Product-X for translation.
Note
Hence one can create a single project called Product-X, which contains the customer Product-X.
The project will contain multiple source files, one for the web app, one for the IOS app, and one for the Android app.
Example 2: Translating a web application and a mobile application for Product-X with different translation teams for the web and mobile applications
In this example, as Product-X grows, your organization has decided on separate translation teams for the web and mobile applications.
Note
In this case, we still need only one project and only one customer since a project can contain multiple source files, each with its own set of linguists assigned.
Therefore the web app is one file, and the mobile application consists of two files (IOS and Android).
Each file has its own team of linguists.
Example 3: A single product with web and mobile apps, whose branding is different between each app.
Your company has decided on some slightly different branding between the web app and each mobile app (IOS and Android). This means that the terminology between the three application platforms and the translation memory contents are slightly different between the three of these.
Note
One could create one unique customer for the android, IOS, and web apps.
However, the customer should be static, and the project dynamic.
Therefore a unique project will be created for all three applications using the same customer called Product-X.
Each project will have unique TM penalty profiles and terminology penalty profiles, to accommodate for the minor differences in terminologies and translation memory.
TM penalty profile
TM penalty profiles
Penalty Profiles penalize the percentage match of a fuzzy match.
Tip
Example: Segment X has an 80% Fuzzy Match against an entry in TM. However, the TM entry was stored for the prescription drug product whereas the translation is applied to over-the-counter drug products. Both are different products and certain segments have slightly different meanings between products. Applying a TM penalty of 5% lowers the fuzzy match from 80% to 75% accordingly.
XTM can apply penalty profiles based on the following criteria:
Tags.
TM Status (Approved or Not Approved).
XLIFF:doc status (Translated, New, Rejected, Validated, Proofed).
Target Language for all projects or per project.
Note
This penalty (Target Language) supersedes all other penalty profiles when more than one is triggered.
Note
The only languages that can have an associated TM Penalty Profile are: Arabic, Dutch, English, French, German, Italian, Portuguese, Spanish
If Multiple ICE or Leveraged matches exist for a given segment.
TM penalty profiles are created in Configuration->Data->Tags->TM Penalty Profiles.
Terminology penalty profile
Terminology penalty profiles
Penalty Profiles in Terminologies remove the term(s) from the linguist view (XTM Workbench), without having to remove them from the terminologies file. This is useful when a term can only be applied to a specific product
Penalty Profiles are based on assigning a tag (either to an individual term or an entire terminology file) or term customer (assigned to a group of terms).
An administrator creates penalty profiles using this procedure.
Note
Prerequisite: Create tags first.
Example 4: Different release cycles between web and mobile apps.
Your company has changed the release cycle for Product-X. Mobile apps are now released one week before the web app. Therefore the due dates for translations have changed.
Note
There is only one customer, but multiple projects, each referencing the same customer Product-X. but with different due dates.
Assigning due dates is a project function.
Example 5: Machine-translated content
Your company has decided to translate help desk articles. Older help desk articles are to be machine-translated with no edits, while newer articles are machine-translated with manual corrections.
Tip
When defining a customer make sure that the translation memory can't be overwritten.
In this use case, both older and new articles use the same terms and TM.
Note
However, you wouldn't want the unedited machine-translated content to accidentally enter the TM for new articles due to someone accidentally approving that content for the TM.
Therefore you would create two customers (one for older help desk articles and one for newer articles). The Project Manager would then share the translation memory between the two.
The translations in the TM for older help desk articles have not gone through a correction step, whereas the newer help desk articles have.
Sharing translation memory and terminology across customers
A translation memory and terminology can still be shared across different customers for items that are similar.
Splitting content into different customers ensures that any updates to terms or translation memory in one customer have no effect on the terms and TM stored in the other.
Sharing TM and terms is especially useful when using machine translation in a workflow.
Note
The sharing of Translation Memory and Terminology is done within each individual Project.
STEP 3: OPTIONAL - Import any existing translations.
Importing Translations (Translation Memory)
Note
There is a maximum file size limitation of 550MB for each import. To import larger files either zip/compress them or please speak with your XTM point of contact.
Importing translation memory
Translation memories can be imported into XTM from:
TMX
XLS
XLSX
single language XLIFF file
Tip
For the best results, we recommend using the TMX v 4b format.
Note
A source segment with no matching text in the corresponding target cell will not be uploaded.
A target segment with no matching text in the corresponding source segment will not be uploaded.
Empty source and corresponding empty target cells will not be uploaded.
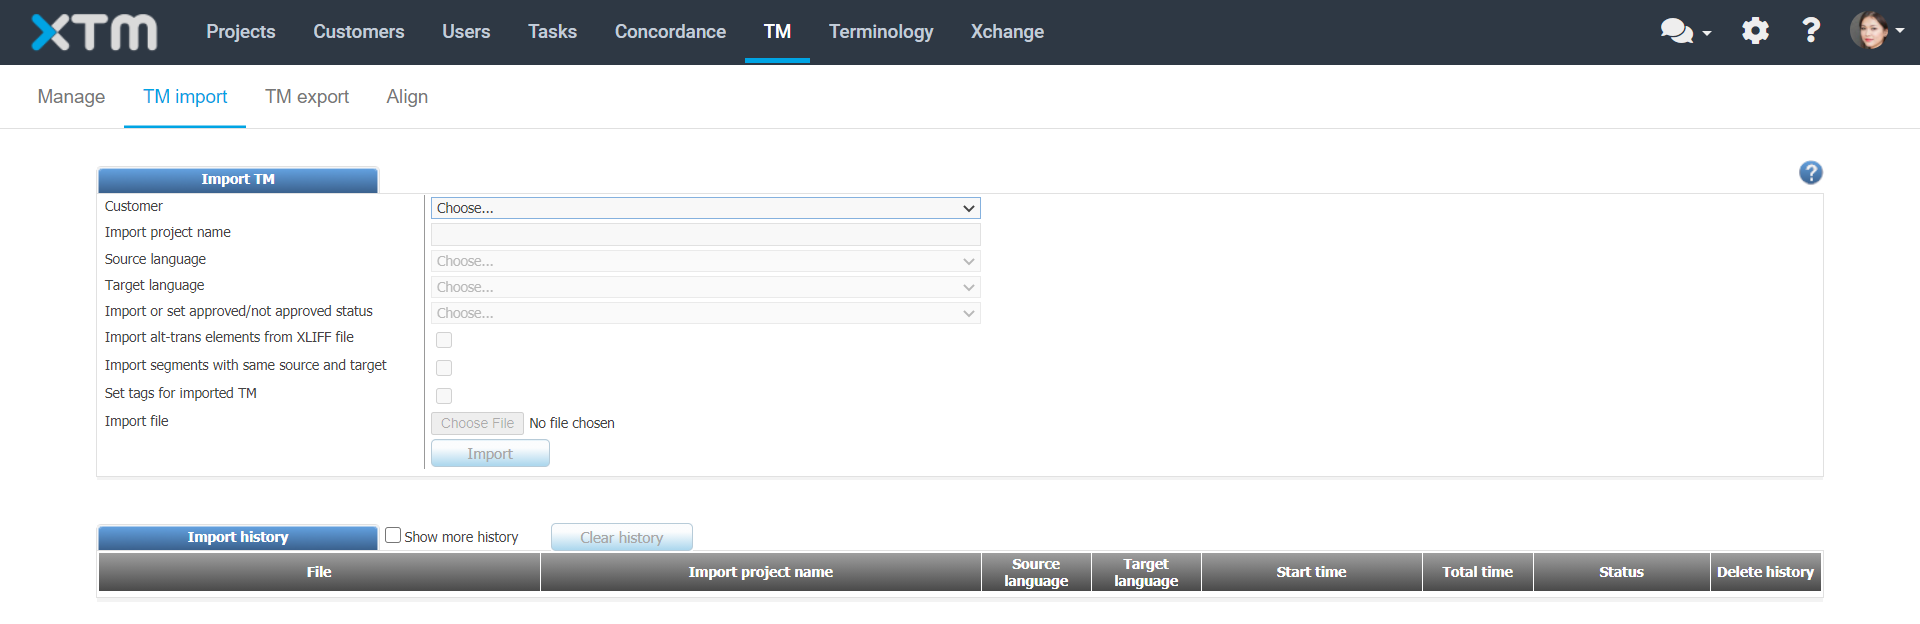
Go to TM tab > TM import.
Select Customer.
Specify the Import project name.
Select the source and target languages.
Specify the Import or set approved/not approved status. Select from the dropdown:
Set as approved
Set as not approved
Import statuses and set as approved if missing
Import statuses and set as not approved if missing
Select the preferred options for Whitespace in TM. Matching is affected by the differences in whitespace processing.
Optionally: Select the checkbox to Import alt-trans elements from the XLIFF file if you wish to import the matching data that is stored in your XLIFF file.
Optionally: Select checkbox to Import segments with the same source and target. Select if you want to import translation units that have the same source and target texts.
Upload the file you wish to import.
Select the Import button.
A new record in the import history section is created that displays the status of the import. The status changes from In progress to Done when the import is finished.
TM import main window

Import history
Translation Memory Import Field Reference
Import Project Name:
Arbitrary name given to this task for historical tracking purposes.
Import or set approved/not approved status:
Determines how each TM entry will be deemed as approved within XTM once it has been imported. The options are the following:
Set as Not Approved.
Set as Approved.
Import statuses and set as approved where missing.
Import statuses and set as not approved where missing.
Whitespace in TM:
Warning
You can choose to keep or remove whitespace characters as required. This might affect the matching score (therefore it is recommended to keep all-white spaces).
The following options are available:
Remove leading and trailing spaces.
Remove redundant inner whitespace.
Remove redundant inner, leading and training whitespace.
Keep all whitespace.
Import alt-trans elements from XLIFF file:
Allows the ability to import TM Matches for XLIFF segments that contain translatable elements.
The xliff translateable (alt-trans) elements are defined here.
Import segments with the same source and target:
Decide if you want to import translation units that have the same source and target texts. (i.e choose to import all units whose translation is the same as the segment source text.)
Set tags for imported TM.
Extract bilingual terminology:
Using an internal AI engine, suggested terminology terms can be extracted by the TM import that can be approved later by a terminologist to validate the term candidates during terminology/glossary import process.
Import file:
Select the browse button to locate the file you wish to import
Translation memory (TM)
Translation memory typically consists of the last known good translation for a given segment (text).
Translation memory is assigned and segmented by the following:
See the list below for a summary of how to maximize the use of translation memory in XTM:
Importing translations from other TMS packages
Translation memories can be imported into XTM from a TMX (the standard Translation Memory file format) or from translations stored in XLIFF files or Excel files.
Tip
For best results, we recommend using the TMX v 4b format.
Once the translations are imported via the TM file, the source (segment) text will need to be uploaded to a new project or an existing project's files tab.
Take note of the following items in regards to segmentation:
Source strings in XTM are segmented by individual sentences. This default setting can be changed.
The advantage is that XTM can incorporate ICE matching and provide smaller segments to translators, which increases their quality and efficiency.
Many other TMS vendors segment strings differently, oftentimes providing larger segments to translators. In such cases, the TM that is imported into XTM from the other TMS vendor will not always provide perfect matches.
Applying context to TM
Note
A single word or string may have multiple meanings. For example, an apple can be a fruit or a computer brand. Applying context will allow XTM to provide better suggestions for any segment and improve the accuracy of the TM Auto-Fill functions.
Tip
XTM has the ability to add custom context rules not indicated here. Please contact your XTM point of contact for more details.
The following methodologies can be used to apply context to segments stored in translation memory:
ICE (context) match
An ICE (In Context Exact) match is a translation that when matched against what's stored in TM, guarantees a high level of appropriateness because it has the same context
Important
In XTM an ICE match occurs when the source content in the current, previous and next segment is an exact match with the current, previous and next segment in TM (I.E the same location in a paragraph). ICE Matching is most relevant when source content is segmented by sentence as opposed to paragraph.
XTM Determines if an ICE or Leveraged Match exists using the following logic:
If the source text is identical to the one stored in TM, then XTM checks if a segment has a segment ID.
If the segment has a segment ID then XTM tries to find if an ICE (context) match exists by matching the source text segmentID with the one stored in TM for that string.
Tip
To include the segment ID in the TM please click here for instructions.
If the segment does not have a segment ID then XTM tries to find if an ICE (context) match exists by matching the source text alone.
When neither of the segmentID / context conditions is met, a leveraged match is returned.
When the translation is saved and the translation becomes approved for TM, XTM saves the translation in the TM and includes the segment ID (if activated) along with the source text, target text, and context (ICE match) by default.
Consider the segment We painted it red last week as used in the following paragraph:
My house used to be yellow.
We painted it red last week.
It looks very different now.
Is not a 100% ICE Match but is a Leveraged Match with the following:
My house used to be very ugly.
We painted it red last week.
It looks nicer now.
The original context was about a color scheme, but the context in the second paragraph is about beauty. Therefore the translation for the segment We painted it red last week may contain different adjectives to describe its beauty versus its.
TM penalty profiles
Penalty Profiles penalize the percentage match of a fuzzy match.
Tip
Example: Segment X has an 80% Fuzzy Match against an entry in TM. However, the TM entry was stored for the prescription drug product whereas the translation is applied to over-the-counter drug products. Both are different products and certain segments have slightly different meanings between products. Applying a TM penalty of 5% lowers the fuzzy match from 80% to 75% accordingly.
XTM can apply penalty profiles based on the following criteria:
Tags.
TM Status (Approved or Not Approved).
XLIFF:doc status (Translated, New, Rejected, Validated, Proofed).
Target Language for all projects or per project.
Note
This penalty (Target Language) supersedes all other penalty profiles when more than one is triggered.
Note
The only languages that can have an associated TM Penalty Profile are: Arabic, Dutch, English, French, German, Italian, Portuguese, Spanish
If Multiple ICE or Leveraged matches exist for a given segment.
TM penalty profiles are created in Configuration->Data->Tags->TM Penalty Profiles.
TM matching reference
There are four basic mechanisms for providing translation matches against translation memory and auto-filling against the contents of the translation memory:
ICE (context) match
An ICE (In Context Exact) match is a translation that when matched against what's stored in TM, guarantees a high level of appropriateness because it has the same context
Important
In XTM an ICE match occurs when the source content in the current, previous and next segment is an exact match with the current, previous and next segment in TM (I.E the same location in a paragraph). ICE Matching is most relevant when source content is segmented by sentence as opposed to paragraph.
XTM Determines if an ICE or Leveraged Match exists using the following logic:
If the source text is identical to the one stored in TM, then XTM checks if a segment has a segment ID.
If the segment has a segment ID then XTM tries to find if an ICE (context) match exists by matching the source text segmentID with the one stored in TM for that string.
Tip
To include the segment ID in the TM please click here for instructions.
If the segment does not have a segment ID then XTM tries to find if an ICE (context) match exists by matching the source text alone.
When neither of the segmentID / context conditions is met, a leveraged match is returned.
When the translation is saved and the translation becomes approved for TM, XTM saves the translation in the TM and includes the segment ID (if activated) along with the source text, target text, and context (ICE match) by default.
Consider the segment We painted it red last week as used in the following paragraph:
My house used to be yellow.
We painted it red last week.
It looks very different now.
Is not a 100% ICE Match but is a Leveraged Match with the following:
My house used to be very ugly.
We painted it red last week.
It looks nicer now.
The original context was about a color scheme, but the context in the second paragraph is about beauty. Therefore the translation for the segment We painted it red last week may contain different adjectives to describe its beauty versus its.
Leveraged match
A leveraged match is when a sentence or phrase in a translation memory (TM) is the same phrase in a different context as the sentence or phrase the translator is currently working on.
Tip
Context is determined via ICE matching.
Fuzzy matches
Refers to the situation when a sentence or phrase in a translation memory (TM) is similar (but not a 100% ICE or Leveraged match) to the sentence or phrase the translator is currently working on. The TM tool calculates the degree of similarity or “fuzziness” as a percentage figure.
XTM Workbench (CAT) tool will show up to 5 fuzzy matches with the highest match rate for a given segment.
Note
This is configured under configuration->Settings->Translation->TM in the Fuzzy Matches section.
Fuzzy Match rates are calculated using one of the algorithms described here.
Fuzzy repeats
Refers to segments with no matches in the TM, but that are quite similar to each other within the project to be translated.
XTM Workbench (CAT) tool will show up to 5 fuzzy matches with the highest match rate for a given segment. This is configured under configuration->;Settings->;Translation->;TM in the Fuzzy Matches section.
TM clean up tools
XTM provides an interface for a TM Expert to perform the following tasks on any individual segment in the TM:
Warning
Only the TM Expert role has access to this feature.
Change the translation text (target).
Change the TM Status (Approved or Not Approved)
Delete a Segment.
This is performed in the TM->Manage window on a per language combination and customer level.
Tip
The advantage of making changes in this location is that XTM provides a total of 14 filters (search criteria) to narrow down the entries being verified.
Auto filling translations
Note
Auto filling with TM entries is done first if machine translation is enabled.
Auto filling occurs each time a project starts or is reanalyzed.
The configuration is done here in the following sections respectively:
ICE Matches
Leveraged Matches
Fuzzy Matches
Fuzzy Repeats
Translations can be configured to auto-fill automatically with a TM entry when any single one or any combination of the following occurs :
ICE match autofill options
ICE Matches where inline variables are the same in the segment and in the TM are auto-filled by default.
ICE matches where inline variables in the source segment and TM entry do not match can also be auto-filled. In this case, the inline variable in the source segment is copied to the translation.
Leveraged match autofill options
XTM can also be configured to auto-fill leveraged matches where inline variables in the source segment and TM entry do not match.
In this case, the inline variable in the source segment is copied to the translation.
Fuzzy match autofill options
95-99%
85-94%
75-84%
Fuzzy repeat autofill options
95-99%
85-94%
75-84%
TM approval mechanisms
Note
XTM automatically stores segments in TM as unapproved.
By default, XTM does not approve any translations for a segment in TM unless the following configurations are made:
Adding a TM Approve workflow step as part of the workflows.
Note
This is an automatic step type that automatically approves all of the segments translated during the current workflow in the TM. The step is closed automatically once the segments are approved.
Within any step in a workflow, there is a checkbox option to approve TM. This automatically approves the segment's translation in TM once it's completed.
Note
This is typically used in a correction or review workflow step.
Manually (no configuration required) regardless of the current state of a project. Simply edit a project using the
 icon and select actions->Approve TM for this project. This approves all of the translations currently in the project for entry into the TM.
Rules for overwriting TM entries
Segments that have a 100% leveraged or ICE match translation can optionally be edited. The new TM entry will be created if the translation for such a match is edited.
Tip
By default, translations populated by ICE and Leveraged TM entries are locked for translation. To change this setting go to Configuration->Settings->Translation->TM. In the first section; Matches General look for the Mark segments as locked when checkbox, and uncheck it in order to enable edits to such translations.
Any combination of the following criteria can be set for editing 100% leveraged or ICE matched translations:
Modify the existing TM record if the project segment has the same:
Modify the existing TM record if the project segment and Segment ID have the same:
Source (i.e. the segment source text is the same as the TM Entry).
Inlines (i.e. the segment source text has the same inlines as the TM Entry).
Context (i.e. the segment source text has the same context as the TM Entry).
Tags (i.e. the segment source text has the same tags as the TM Entry).
Segment ID (i.e. the segment source text has the same segment ID as the TM Entry).
Tip
To change this settings go to Configuration->Settings->Translation->TM. In the first section; Matches General and change the Modify the existing TM record if the project segment .. entries.
The TM is live, so whatever happens anywhere inside or outside the project can optionally be leveraged even as a full match within XTM Workbench (CAT) for the linguists.
This is done by opening the project editor's General Info Tab and choosing the customers whose translation memory is to be leveraged, even if these customers are outside the scope of the project.
STEP 4: OPTIONAL - Import any existing terms/glossaries
Import the terminology file into XTM
Tip
Consult the Import terminology field reference as a guide when completing the procedure below.
Importing terms in XTM
Caution
Images illustrating a concept cannot be imported!
Prepare a file in one of the following file formats:
XLS
XLSX
TBX
MTF
XTM term statuses to include in the import fileVALID
REJECTED
FORBIDDEN
NOT_APPROVED
Caution
Columns with terminology translations require UTF-8 language code headers.
Check language codes supported by XTM.
Check that the source file contains:
a list of terms in a source language.
term equivalents in one or multiple target languages.
Note
Other term fields are optional.
Go to the Terminology > Import tab and follow the on-screen instructions.
During term import you can:set the status for all imported terms
import the statuses if terms in the import file include statuses
specify the status that will be set to terms without a valid status in the import file
tag terminology lists during the import to improve terminology categorization
Caution
You can add duplicate terms to existing concepts in a termbase rather than creating new concepts from them by clicking the “Add to existing concepts” checkbox and selecting the language to analyze for duplicates.
Make sure that the concepts are the same!
Adding translation to existing concepts
All terms in XTM are linked to a concept and so when you add a translation for a term it is stored in the termbase and linked to the concept.
When importing terms, if you do not select Add to existing terms, a new concept will be created for each row of terms irrespective of whether one or more of the terms already exist in the termbase.
Go to the Terminology tab. Enter the required search criteria and select Search.
Select Add to existing concepts
A new dropdown field is displayed with a list of languages.
Import Terminologies Field Reference
Every terminology file is linked to a customer. Each customer can have only one terminology file associated with it, but each terminology file can be associated with multiple customers.
Tip
To associate a terminology file with multiple customers, the terminologist can import the same file multiple times, each time with a unique customer.
Or the terminologist can upload the terminology file once for a single customer and then contact the project manager and have them select this terminology file in each customer's settings tab.
Acceptable extensions: XLSX, XLS, TBX, MTF.
By checking this box, if a term already exists for the selected language, then the translation will be added to the existing concept, otherwise, a new concept will be created.
A concept is an overarching item in the hierarchy of meaning; E.g. concept=residence, term=condo, hut, apartment, etc.
A single concept can have multiple terms.
Concepts can contain images and/or explanations.
Terms and their corresponding translations can have one of 4 statuses:
Tip
These statuses can be changed later by a terminologist.
Forbidden
NEVER should be used, i.e. the translation is wrong in such a way that it would cause major issues (e.g. legal terms).
Not Approved
it's not that wrong, however, we do not use this term and would prefer to use another version or the term has not been approved yet by the appropriate terminologist.
Rejected
A terminologist has deemed the translation to be inappropriate.
Valid
A terminologist has agreed that the translation is the correct one.
Terminology
Terminology sometimes known as glossary, is a set of terms, usually single words or very small phrases like company slogans, that require specific predefined translations.
Terms are created in the terminology manager, created by a linguist in Workbench (CAT), or when terminologies are imported. In either case, there is an approval process before they are made available to linguists.
Each customer and project can have its own unique terms or no terms at all.
By default, a project contains all of the terms each customer added to the project has. Terms can be removed from projects by using terminology penalty profiles.
The following functions and features can be leveraged in terminologies:
Terminology custom fields
XTM can distinguish translations for terms based on the following default criteria (Custom Fields):
Tip
An administrator can configure more Custom fields to further distinguish translations for terms using this procedure.
abbreviation
acronym
full form
phrase
short form
variant
adjective
adverb
noun
other
properNoun
verb
feminine
masculine
neuter
other
When terms are created in the terminology manager, created by a linguist in Workbench (CAT), or when terminologies are imported they are immediately assigned to the selected customer(s).
An individual customer has the option to disable terminologies. I.e they have no terms associated with them)
This single terminology file is made available to all customers by default (Customers have the option to disable terminologies).
By default, a project contains all of the terms each customer added to the project, has. Terms can be removed from the project by doing the following:
An administrator creates tags using this procedure.
An administrator creates a terminology penalty profile(s) using this procedure.
A terminologist assigns the tags to the terms in the terminology manager.
A project manager assigns these same tags to each project. Terms with the tag assigned here are excluded from the project.
Terms can either come from the XTM terminology engine or TermWeb from Interverbum Technology.
The source (XTM or TermWeb) is assigned to each customer. The default for each customer is XTM.
Optimizing terminology processing
Note
XTM provides two methods for optimizing Term displays in Workbench (CAT) for linguists. One of these methods is used when starting off and terminology files are smaller, while the other is optimized as Terminology files grow in size.
Default Mode (Optimized for smaller terminology files)
Terms appear to a linguist in XTM Workbench as they activate each segment (I.e. Click on it or move to the segment via a keystroke).
Terms appear for only one segment at a time, as they are activated.
Match Terms in Analysis Mode (Optimized for larger terminology files)
The terms for each segment are processed when a project is analyzed (E.g. a file is uploaded to a project). This typically occurs prior to the start of a project.
In this manner all of the terms are shown to the linguist in XTM workbench without requiring a linguist to activate the segment.
In the background XTM develops a list of any terms that have changed in the terminology since the start of the project.
When a linguist activates a segment (I.e. Click on the segment or move to the segment via a keystroke), XTM will determine if the term has changed since the start of the project and if it has, it will show the changed term to the linguist.
Tip
XTM recommends activating the Match Terms in Analysis Mode at all times. This is done by an Administrator.
Concepts and terms
A concept is an overarching item in the hierarchy of meaning; E.g. concept=residence, term=condo, hut, apartment, etc.
A single concept can have multiple terms.
Concepts can contain images and/or explanations.
Concepts are defined by the domain attribute. In other words, if the concept is residence, then the domain is residence. The domain can only be added by importing a terminology file.
STEP 5: MANDATORY - Create projects and project templates
Creating a new project or a new project template
Tip
Please consult the project definition guide for more details.
This procedure outlines the basic steps for creating a project in order to start translation jobs using the basic options of XTM.
To Create a project perform the following steps:
Click on the Projects tab located on the topmost menu.
Click on the Add Project button located on the far right-hand side
Fill in the General Information section using this field descriptor as a guide.
Tip
In this section, it is preferable to assign a Project Template (the last option in this section) for consistency and speed of reuse.
If the Project Template was entered when completing the General Information section in the previous step then all of the remaining fields will be pre-populated with the settings in the project template .
Fill in or verify the entries in the Translation section using this field descriptor as a guide.
Fill in or verify the entries in the Workflows section using this field descriptor as a guide.
If this is the first time that this project is being created and it was not generated using a project template (step 4), then:
Note
Only the specific role of Project Manager can perform this step. None of the other project manager-type roles can create project templates.
Scroll down to the bottom and click on the Save as a Template button. This will allow these settings to be reused.
Repeat steps 1 to 4. Complete step 3 by selecting the project template created in this step.
Scroll down to the bottom and select one of the following Save options:
 - This button saves and creates the project.
 - This button saves and creates the project and keeps the same window open with all options empty so that a new project can be created.
Assign linguists, LSPs and user groups to the workflow steps.
Project field descriptions - general information section.
Mandatory Content Tip
When starting off, simply complete the Mandatory items.
Customer Name (Mandatory):
Tip
The customer names available in the drop-down list are the ones that the administrator or project manager gave access to.
Select the customer to assign to this project.
The Customer Alias (if configured) will not appear in this list, only the Customer name will..
Project Name (Mandatory):
Enter a unique project name.
The project name will appear to the linguists.
Project names cannot contain any of the following characters: /, |, \, :, *, ?, ", <, >, {, }, nor any characters unsupported by
XML
Description (Optional):
Only visible on the project setup screen.
Reference ID (Optional):
Can be optionally used as a filter or shown to project managers in the project list or in a linguists task list.
Delivery Due Date (Optional):
Deadlines are shown to users.
Deadlines can be viewed and tracked in the Project Manager's monitoring reports.
The Delivery Due Date is the due date for all workflow steps in a workflow.
Auto-Calculate due dates for workflow steps (Optional):
To use this option you must first configure relevant Workflow definitions.
Calculates the due dates for each workflow step based on the workflow start and due dates.
When these dates are not specified, the project creation date and delivery due date are used instead.
If enabled in the Configuration > Settings > Projects tab, two optional due date fields are available:
Workflow start date.
Workflow due date.
You can fill them in to increase the accuracy of automatically calculated due dates, or leave empty to use the project creation and delivery due dates instead.
Use previous settings (Optional):
All settings from the last project that was created will be auto populated (except for customer specific settings, such as MT configuration, automation for segments etc.)
Templates (Optional):
Choose a project template in order to prepopulate all of the remaining fields during project creation, with the values configured in the template.
Project field descriptions - translation section.
Mandatory Content Tip
When starting off, simply complete the Mandatory items.
Tip
These fields are only available when creating a project and can't be modified after a project has been created.
Source Language (Mandatory):
The language of the content to be translated
The languages appearing in this drop-down list are configured here.
Target Languages (Mandatory):
The language(s) the source content is being translated into.
The languages appearing in the left-hand side list box are configured here.
After selecting the languages from the left-hand side list box, click the
button to move these languages to the list box to the right containing all of the selected target languages.
Subject Matter (Optional):
Note
The only purpose of adding a subject matter to a project is to better estimate the costs associated with a project when dealing with specialized subject matter that is usually more expensive.
Linguists can be assigned a subject matter expertise.
Linguists available for this project will be limited to the subject matter selected here.
Estimates can only be generated if a rate card is created for this user
For Translation ( Mandatory only for file-based projects):
Note
This step is not required if using the API or a GIT Connector.
Select all source files that require translating here, regardless of file type.
Click the
 button to select a file to upload. Hold the shift or ctrl key down to select multiple files.
To add/remove more files click on the appropriate button
 . When adding files, after clicking the plus symbol then click on .
QA Profile (Optional):
Select the QA profile to use. When starting off, use the default QA profile.
Joining Files (Optional):
Checking this box merges files with the same file format into a single file for linguists to view in XTM Workbench.
Note
Visual Mode in XTM Workbench will usually not work when joining files. The exception is when files with the DITA file format are joined. In this case, the visual mode will work.
Tip
An administrator can customize the details of joining files using this procedure.
Additional Files (Optional):
Checking this box allows the addition of the following:
Reference material:
Upload additional information that may assist in the translation process, such as a style guide.
Preview files (Visual Context):
Note
This option is mostly unnecessary if using HTML files or design tool files, as visual context is automatic for most of these file types (InDesign being the exception). However, it is useful for most other developer-centric file types such as JSON, and PO where visual context is not automatically applied.
Add images that can be used as context for a given segment. These images will appear within Workbench (CAT) in the segment that they are associated with. The image name must match the segment ID name.
Tip
When using this feature contact your XTM point of reference in order to enable segment IDs.
Segment Filter Profile (Optional):
A set of predefined filters. Can be configured in Configuration->Segment Filter Tab.
Project field descriptions - workflow section
Default Options
This section describes the default options. Depending on the configuration settings configured by the user more options may appear than are listed here.
Mandatory Content Tip
When starting off, simply complete the Mandatory items.
Main workflow (Mandatory):
Select one of the default workflows.
Different workflows per target language (Optional):
Customize the workflow based on the target language.
An example of such a use case might be when using Machine Translation. Certain languages might not be well served by Machine Translation.
Workflow for Non-Analysable files (Optional):
By default, Non-Analysable files such as images, empty files, or files in unsupported file formats are not included in the workflow.
This option will then add non-text-containing files (e,g, audio/video files, images, etc.) that would normally be edited offline to the workflow.
Assigning linguists, LSPs and user groups to workflow steps
Open the project editor.
From the left hand side menu, click the workflow tab.
From the target language drop down, select the target language that the linguist belongs to.
From the workflow management section located just below, assign a linguist, user group or LSP to each workflow step, and for each file in this project.
Tip
When assigning a user group, the linguist within the user group which is assigned to the step is automatically determined using the logic described here.
When assigning an LSP, the LSP project manager determines which linguist to assign from their instance of XTM.
Repeat steps 3 and 4 for each language.
.
Tip
A project will assign a translation job to linguists.
The project template will allow for standardization and reuse. Projects can be ever-changing as they are meant to adapt to the changing needs of the organization, thus requiring a template.
OPTIONAL - Creating projects that are subject matter specific.
Tip
This is specifically used when generating estimates or purchase orders, which are based on costs that are subject matter specific.
OPTIONAL - Assign and customize machine translation engines for individual customers or projects.
Tip
Consult this guide to better understand whether or not to execute this step.
STEP 6: MANDATORY - Verify and start the project
Verifying and starting a newly created project as a project manager
Assign the linguists to their appropriate workflow steps.
Verify that the project will start correctly by opening the linguist's view (XTM Workbench) in read-only mode and verifying the items in this checklist.
Manually start the project once the verification is complete..