Adding an LSP to your XTM instance
Important
Within XTM an LSP is defined as a subcontractor that has its own instance of XTM.
XTM can connect to as many LSPs as you require.
Caution
LSPs can be used in combination with any internal users for project workflow step assignments.
To add an LSP to your XTM Instance perform the following steps:
Configure sub-contracting by adding an LSP. - Mandatory
Warning
Pre-Requisite: If the LSP does not have their own instance of XTM, then have the LSP create a free sub-contracting account that will use a portion, or all of your end-user licenses when working on your projects.
Establish a connection to the LSP and allocate licenses to your LSP if necessary. - Mandatory
Configure sub-contracting
From the top navigation bar in XTM Cloud click on Users.
Just below and to the left, click on the LSP's tab.
Select the Add LSP button to open a dialog window.
Add the contact information of the LSP using this field reference.
Scroll to the bottom and click on the Add button.
LSP field reference - general tab
Mandatory Fields:
Important
Enter the information of the contact person at the LSP responsible for the connection.
Typically this is the individual who manages the relationship (i.e the connection between your XTM instance and the LSP's XTM instance) between the end user and the LSP.
Company Name
First Name
Last Name
E-mail
Note
The value entered here is the e-mail address that XTM Cloud sends the connection information to.
Optional Fields:
Project Manager:
Enter the client contact (PM) who manages the relationship with the LSP.
Note
Only a single PM can be assigned on the contractor's side to manage this relationship (i.e the XTM connection to the LSP).
VAT Number:
The LSP VAT number if applicable.
Display Contractor PM details on LSP's account:
Displays the contractor's PM name to the LSP.
The PM is selected from the drop-down just below this check-box.
Contractor PM Details:
Warning
Pre-Requisite: The Display Contractor PM details on LSP's account must be checked:
Select the PM from the contractor's side that is displayed to the LSP.
Dummy User For Cost Generation:
Tip
Although dummy users can be configured for LSPs, they are unnecessary since very few LSP connections will be created in your application.
Note
The fields not described here are merely meant as contact info for the LSP that appears on purchase orders created within XTM.
Creating a free LSP sub-contracting account
There are two ways to create a free LSP Account:
Complete the registration form found via this link and wait for the resulting activation e-mail.
Receive an invitation directly from the XTM contractor. This is described in step 2 of this procedure.
Establish a connection to the LSP
Important
This procedure has certain steps required for the subcontractor and others for the contractor.
From the contractor instance of XTM send your connection information to the subcontractor by performing the following steps:
Edit the LSP by clicking on users from the top menu, then LSPs.
From the left-hand side menu, click on the connection tab.
Check the appropriate checkboxes in the User Type section.
From the licenses section determine the number of licenses the LSP can borrow from your application. - Optional
Note
This is required only if the LSP is using a free subcontracting account and can be changed anytime.
Scroll to the bottom of the page and click the send e-mail button. This sends the pre-configured information found in the Your connection information to send to the LSP section to the LSP for confirmation.
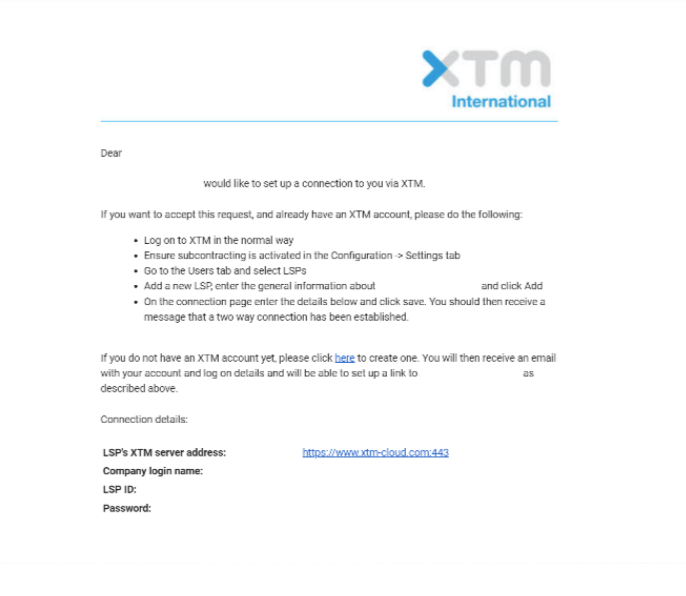
An e-mail is now sent to the LSP. Have the LSP perform the steps in their XTM Instance that is indicated in the e-mail they received as seen below:
From the.contractor instance of XTM, verify that the connection with the LSP is now established by performing the following:
Edit the LSP and click on the Connection tab from the left-hand side menu.
Scroll down to the Connection information from the LSP section. Notice that the LSP connection is now populated.
From the top menu in XTM Cloud click on Users. From there click on LSPs.
Find the LSP on the list and on the far right verify that a green circle appears under the connection column for this LSP. If it does appear then the connection is established and you can send content to the LSP for translation.