Creating your first translation job as a team
Important
The optional steps are only required when migrating from an existing system, or when leveraging existing translations or terms. These optional steps can be performed simultaneously.
MANDATORY - The administrator sets up XTM
Tip
The work done by the administrator here will enable the creation of the first translation job, define the project manager required to execute these guides, and allow for the implementation of a continuous workflow.
Important
Prerequisite: The administrator has finished configuring XTM (I.e Step 1).
OPTIONAL - The TM expert will import existing translations.
Important
Prerequisite: The project manager has added customers and assigned you the role of TM expert.
OPTIONAL - The terminologist will import any existing terms.
Important
Prerequisite: The project manager has added customers and assigned you the role of terminologist.
Administrators guide to getting your team set up
Warning
Each one of these steps must be performed by the system owner who will be given the role of Administrator by XTM when setting up the account.
Tip
Each task to check off is included in the recommended sequential order to execute, along with a brief summary of its purpose and use cases. Please execute and check off the tasks in the order indicated in the checklist.
The items labeled as optional are not required for project delivery but are placed in the order in which they need to be executed nonetheless.
STEP 1: MANDATORY - The system owner creates a user who is given the role of project manager.
OPTIONAL - Connect to an LSP and use their users and linguists.
Tip
LSPs can be used simultaneously with internal users.
STEP 5: MANDATORY - Configure security settings.
Tip
Enforce your specific company security-related policies such as passwords, in this step.
STEP 6: MANDATORY - Create a message in XTM, to notify the project manager that was configured in this procedure to implement their getting started guide.
Project manager's guide to creating your first translation job
Caution
This guide assumes the user has basic localization knowledge.
The purpose of this guide is to help a project manager configure XTM when using it for the first time in order to send content for translation quickly, using only the most basic features of XTM.
The focus will solely be on translatable content originating from files.
Tip
Each task to check off is included in the recommended sequential order to execute, along with a brief summary of its purpose and use cases. Please execute and check off the tasks in the order indicated in the checklist.
The items labeled as optional are not required for project delivery but are placed in the order in which they need to be executed nonetheless.
STEP 1: MANDATORY - Wait for confirmation from the administrator indicating that they have completed their Getting Started Guide (I.e wait for them to set up XTM). The confirmation will appear the next time you log in to XTM.
Note
Alternatively, contact the administrator for confirmation.
STEP 2: MANDATORY - Define linguists involved in the localization project.
OPTIONAL - Define user groups consisting of users with a similar skill set.
Tip
This is necessary when using multiple linguists who are given the option of refusing a translation job because of availability. In that manner, the job is automatically given to another user in the user group based on a predefined allocation order defined in this step.
OPTIONAL - Add users who are TM experts.
Tip
When first starting, the terminologist, and TM Expert are necessary for migrating to XTM from another system. The TM Expert will import translations, and the Terminologist will import terminologies/glossaries.
STEP 3: MANDATORY - Define customers.
Important
Once this step has been completed contact the terminologist and the TM manager and inform them that the customers have been defined so that they can start their work, using their getting started guides.
This is only required if you are migrating from another TMS or you have existing translations or terminology (glossary) terms that you wish to leverage.
STEP 4: MANDATORY - Create projects and project templates.
Important
If generating estimates or purchase orders, which are based on costs that are subject matter specific, then use this procedure instead, to assign a translation job.
Tip
The project will assign a translation job to linguists.
The project template will allow for standardization and reuse. Projects can be ever-changing as they are meant to adapt to the changing needs of the organization, thus requiring a template.
OPTIONAL - Assign and customize machine translation engines for individual customers or projects.
Tip
Consult this guide to better understand whether or not to execute this step.
TM experts guide for migrating translations from other TMS vendors
Tip
For more information consult the translation memory guide.
MANDATORY - Wait for an activation email confirming that the project manager has created your user account with the TM expert role.
Note
Alternatively, contact the project manager for confirmation.
MANDATORY - Contact the project manager and ensure that they have added at least one customer to XTM.
MANDATORY - Verify that the segmentation rules are the same in the other TMS package.
Important
By default XTM segments by sentences. This rule can be customized. However, segmenting by methods other than sentences will remove ICE context matching capabilities, and will make it harder for linguists to perform their translations since longer segments are more difficult to translate and review.
If the segmentation rules are the same then import the translations (I.e import translation memory).
If the segmentation rules are not the same then consider the following choices :
Import the translations as a point of reference (fuzzy matches) for translators.
Reach out to your XTM point of contact in order to change XTM segmentation rules to match the segmentation rules of the other TMS package. Then import the translations.
Warning
ICE matches will no longer work with this option, but leveraged matches will.
Use Excel or XTM to manually migrate the translations.
Importing Translations (Translation Memory)
Note
There is a maximum file size limitation of 550MB for each import. To import larger files either zip/compress them or please contact our support team (support@xtm-intl.com).
Importing translation memory
Translation memories can be imported into XTM from:
TMX
XLS
XLSX
single language XLIFF file
Tip
For the best results, we recommend using the TMX v 4b format.
Note
A source segment with no matching text in the corresponding target cell will not be uploaded.
A target segment with no matching text in the corresponding source segment will not be uploaded.
Empty source and corresponding empty target cells will not be uploaded.
Go to TM tab > TM import.
Select Customer.
Specify the Import project name.
Select the source and target languages.
Specify the Import or set approved/not approved status. Select from the dropdown:
Set as approved
Set as not approved
Import statuses and set as approved if missing
Import statuses and set as not approved if missing
Select the preferred options for Whitespace in TM. Matching is affected by the differences in whitespace processing.
Optionally: Select the checkbox to Import alt-trans elements from the XLIFF file if you wish to import the matching data that is stored in your XLIFF file.
Optionally: Select checkbox to Import segments with the same source and target. Select if you want to import translation units that have the same source and target texts.
Upload the file you wish to import.
Select the Import button.
A new record in the import history section is created that displays the status of the import. The status changes from In progress to Done when the import is finished.
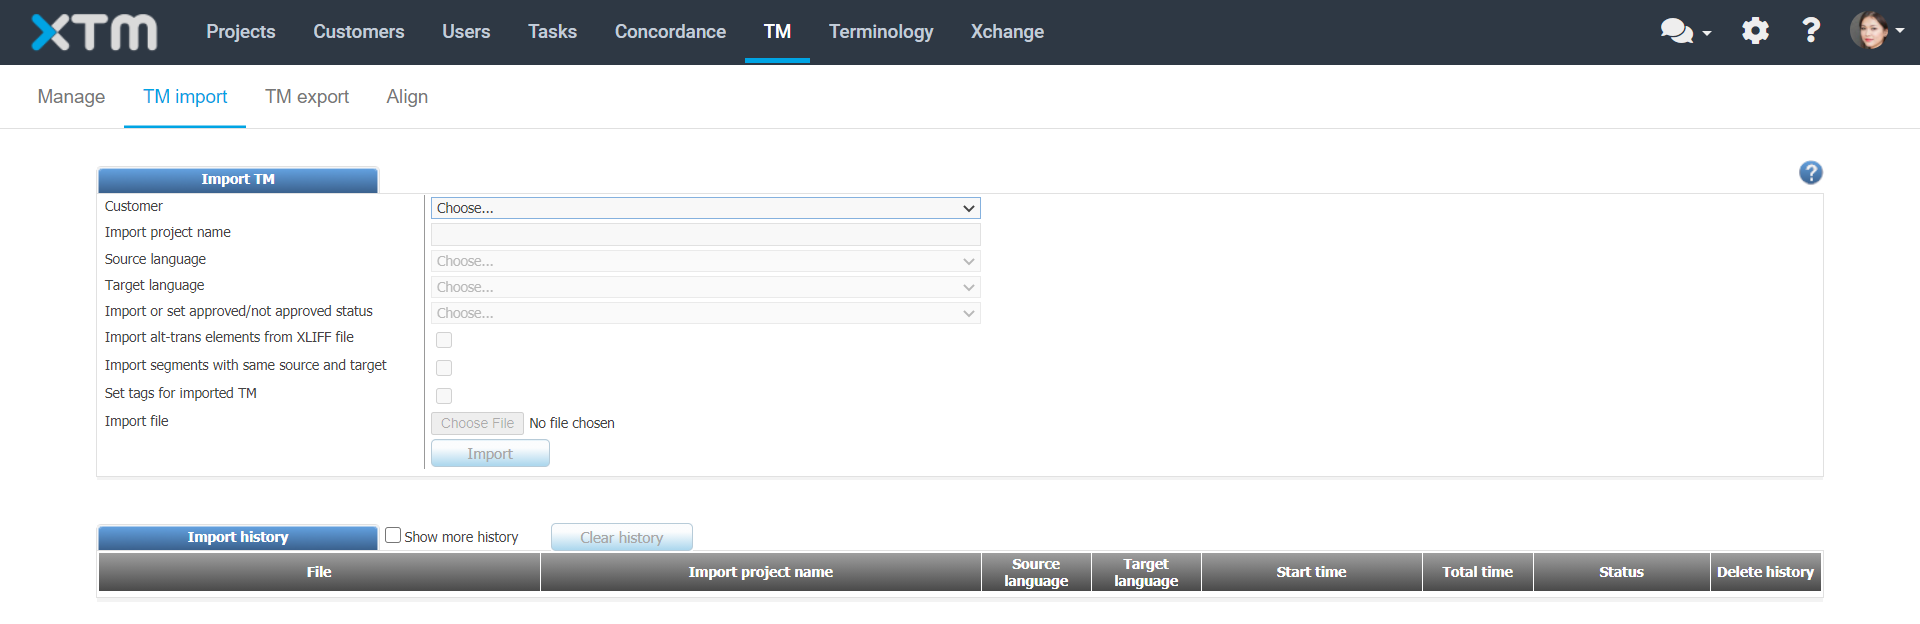
TM import main window

Import history
Translation Memory Import Field Reference
Import Project Name:
Arbitrary name given to this task for historical tracking purposes.
Import or set approved/not approved status:
Determines how each TM entry will be deemed as approved within XTM once it has been imported. The options are the following:
Set as Not Approved.
Set as Approved.
Import statuses and set as approved where missing.
Import statuses and set as not approved where missing.
Whitespace in TM:
Warning
You can choose to keep or remove whitespace characters as required. This might affect the matching score (therefore it is recommended to keep all-white spaces).
The following options are available:
Remove leading and trailing spaces.
Remove redundant inner whitespace.
Remove redundant inner, leading and training whitespace.
Keep all whitespace.
Import alt-trans elements from XLIFF file:
Allows the ability to import TM Matches for XLIFF segments that contain translatable elements.
The xliff translateable (alt-trans) elements are defined here.
Import segments with the same source and target:
Decide if you want to import translation units that have the same source and target texts. (i.e choose to import all units whose translation is the same as the segment source text.)
Set tags for imported TM.
Extract bilingual terminology:
Using an internal AI engine, suggested terminology terms can be extracted by the TM import that can be approved later by a terminologist to validate the term candidates during terminology/glossary import process.
Import file:
Select the browse button to locate the file you wish to import
Terminologists' guide to importing terminologies (glossaries)
Tip
The terminology implementation in XTM is described in detail here. Use this as a guide to determine your department's terminology requirements.
Tip
Each task to check off is included in the recommended sequential order to execute, along with a brief summary of its purpose and use cases. Please execute and check off the tasks in the order indicated in the checklist.
The items labeled as optional are not required for project delivery but are placed in the order in which they need to be executed nonetheless.
MANDATORY - Wait for an activation email confirming that the project manager has created your user account with the terminologist role.
Note
Alternatively, contact the project manager for confirmation.
MANDATORY - Contact the project manager and ensure that they have added at least one customer to XTM.
OPTIONAL - Prepare a terminology file to use as a template for importing data.
Tip
This is useful for formatting the terminology file that will eventually be imported into XTM, as the original terminology file may be coming from a different TMS vendor, and such will be formatted differently.
MANDATORY - Import the terminology file into XTM.
OPTIONAL - Have the administrator contact the TM expert so that the TM Expert can extract terminologies from the translations they are importing from other TMS vendors.
Tip
Using a built-in, proprietary AI algorithm, XTM can look for the best term candidates in the source (monolingual) and/or target text (bilingual) in a TM file and extract them into a terminology file. The terminologist can then decide whether to approve these terms for use or not and import them into XTM Terminology.